


Try this homemade method of ensuring proper placement.
Chest tube thoracostomy is a procedure that all ED providers must feel comfortable doing. Regardless of the setting, this can be an emergent, life-saving procedure that needs to be practiced depending on the frequency a provider does them.
To prevent losing skills in between exposures, we have created an easy to build and low-cost trainer. There already exist simulation trainers for chest tubes that emphasize proper placement, with less emphasis on hand tying the tube in place.

Many chest tubes fail because they are inappropriately secured after being placed. Hand tying sutures to secure chest tubes is a skill infrequently done in the emergency department.
If the chest tube falls out, patients are then at increased risk of hypoxia due to the underlying mechanism and increased rate of infection when an additional tube needs to be placed.
Proper hand tying requires practice, and this simple trainer can assist with creating a more secure tie and fewer complications for the patient.

During a teaching shift in the ED working with students and residents, we went to the storage room where we were able to create this trainer within a total of five minutes.
Once they started using the trainer we quickly saw the increased confidence and mastery of this simple, but seldom practiced skill.
Items required for Chest Tube Securing model:

- Tissue Box
- 14 Fr All-Purpose Urethral Catheter
- Tape
- 0-0 Silk suture
- Needle driver
- Pickups
- 10 mL Syringe or ET tube or Chest Tube
Assembly for Chest Tube Securing model:
Step 1: Empty tissue box

Step 2: Cut the catheter in half

Step 3: Lay the catheters across the top, taping them on the sides of the tissue box


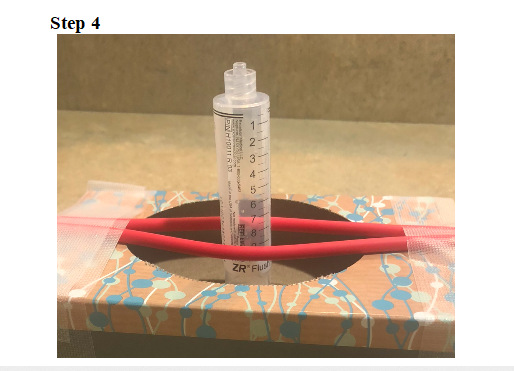
Step 4: Insert Syringe/Chest tube between the middle of the catheters

Step 5: Practice securing the tube with a purse-string suture, going through the catheters like skin

Step 6: Practice securing the tube with hand ties

2 Comments
I think it is a good idea. But you need something to produce ‘blood’ to obscure your needle and driver.
I found that to secure a chest tube, and keep the tube from slipping in or being accidentally pulled out through sutures wrapped around the tube, it was helpful to: 1) at the skin, wrap sterile 1″ gauze around the tube a few times; 2) just above this, wrap 1″ cloth tape around the tube a couple of times, pinching the tape on one side as you wrap to form a small tab; 3) after using a deep horizontal mattress suture with 0 silk approximating the incision on either side of the tube, pass the needle through the tab, then 4) wrap the suture tightly in opposite directions around the taped tube several times and tie. You can further secure the tube by taping it to the chest wall a few inches away from the insertion site.
When the tube is removed, cut the suture at the knot and unwind it from around the tube and tape. As the tube comes away from the chest, cinch the two ends of the mattress suture and tie, closing the incision.