


The following scene is all too familiar. You are approached by nursing because your patient does not have IV access. The patient is a middle-aged male with a history of type 1 diabetes and recurrent visits for gastroparesis and occasional diabetic ketoacidosis (DKA).
Nursing has already attempted multiple times and ultrasound-guided peripheral intravenous (PIV) access was attempted by the vascular access team without success. The department is busy and placing a triple lumen central line for access is not ideal given the time constraints and possibility the patient could be discharged if this is just his gastroparesis and DKA is not present. What are your options?
Interosseous (IO) lines are great resuscitation lines in the critically ill. However, most physicians are not utilizing IO’s in the less-sick patient population. The patient in this example clearly requires access for diagnostic and therapeutic interventions. Suddenly, you recall hearing something about a “peripheral IJ” for situations just like this.

A peripheral IJ (PIJ), also called a “Rapid IJ” or “Easy IJ”, is a common term utilized to describe the procedure of placing a single lumen intravenous catheter into a patient’s internal jugular (IJ) vein. The technique has been well-described for years but depending on local practice patterns, it may still be a novel concept. It provides rapid access in a complex patient through which to initiate diagnostic and therapeutic interventions.
The peripheral IJ is a great option in a difficult access patient who doesn’t requires a central line for caustic medications or multiple points of access. The great thing about this procedure is that it incorporates skills that many physicians already possess. If you can place a central line or an ultrasound-guided peripheral IV, then it is quite simple; it is often easier to cannulate the larger internal jugular vein than a small peripheral vein in the arm.
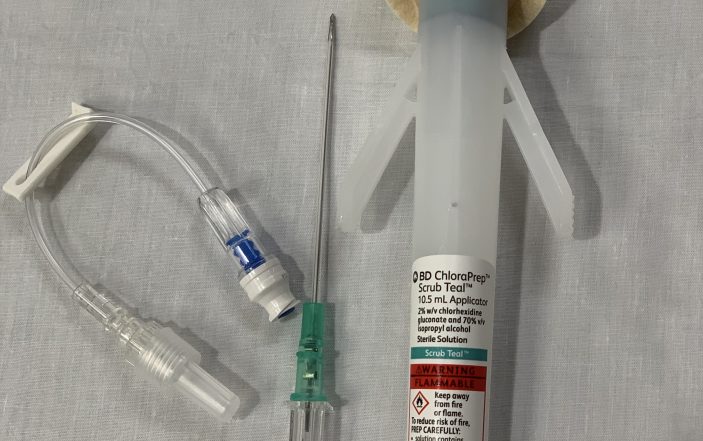
Equipment needed, setting up for a Peripheral IJ:

The same equipment utilized for an ultrasound guided peripheral IV is utilized for a peripheral IJ. A longer length catheter should be used, and a 2.5 in (6.4 cm) catheter is often sufficient except in the morbidly obese. Practice variation does exist with the degree of sterile procedure that is employed. It ranges from a technique that mirrors peripheral IV placement to use of a sterile sheath, gloves, and towels. A single-use sterile gel, sterile skin prep, and sterile probe cover should always be used. A flush, J-loop or IV cap, and transparent film dressing are also needed.
Image 1: Basic equipment used for ultrasound-guided peripheral IJ line placement.

The patient should be placed in a supine position, often in Trendelenburg, to distend the internal jugular vein. Use the high-frequency linear probe. The ultrasound machine should be placed near the patient’s chest level with the screen facing the head of the bed. This allows you to cannulate the IJ while keeping your ultrasound images in a direct line of sight.

Confirmation of internal jugular target:
The vein should be thin walled, easily compressible, not pulsatile, and is frequently oval or triangle-shaped while the carotid artery will be pulsatile, circular, and have thicker walls. Color flow or doppler can be utilized to further confirm if needed. The IJ and carotid can be side-by-side or directly on top of one another. This frequently changes as the patient’s head position moves (Image 2).

Image 2: Right internal jugular vein (IJ) and carotid (C) artery positions with head at neutral (left), 45 degrees (middle), and 90 degree (right) positions.
Technique for performing procedure:

The technique for PIJ insertion mirrors ultrasound-guided PIV placement. See Part 1 of this write up for more details on placing an ultrasound-guided line. Find a position that has the least amount of sternocleidomastoid (SCM) muscle overlying the vessels while ideally having the IJ lateral to the carotid artery.
Approach the skin at a 45 degree angle at an appropriate distance away based on the Pythagorean Theorem discussed in Part 1. If you have a cooperative patient, they can Valsalva to further dilate the IJ prior to needle insertion. The needle is “walked” down to the vessel. Visualization of the needle in the vessel is confirmed using the hyperechoic target sign and the catheter is passed over the needle into the vessel. Remember to advance the needle and catheter just beyond getting the flash of blood – the needle is longer than the catheter and you need to ensure the catheter is also inside the vessel before sliding it down over the needle.
Image 3: Tenting of the anterior wall of the internal jugular (IJ) vein with the needle (left) and target sign within the IJ (right). The carotid (C) artery is below and medial to the IJ.

Confirmation of placement:
Confirmation of placement is similar to a peripheral ultrasound guided IV. The catheter should flush and draw without difficulty. While many experts advocate performing the procedure in a short axis plane, viewing the needle and/or catheter in long axis after completion can help confirm placement in the internal jugular vein through direct visualization.
Pearls:
Provides rapid access to initiate diagnostic and therapeutic interventions in a patient not thought to require central line placement.
Faster option than formal central line access.
Current literature on this topic has shown safety of this technique with extremely low risk of complication.
Pitfalls:
Communication is key. If the patient is admitted, make sure the inpatient team is aware of the line. Communication of the resuscitative nature of the line that needs to be removed once better access is obtained, is important.

Losing track of the needle tip during placement can result in iatrogenic injury, similar to placing a central venous catheter, such as pneumothorax, hematoma, and carotid cannulation or puncture.
References/Resources:
Moayedi S, Witting M, Pirotte M. Safety and Efficacy of the “Easy Internal Jugular (IJ)”: An Approach to Difficult Intravenous Access. J Emerg Med. 2016; 51(6):636-642. DOI: 10.1016/j.jemermed.2016.07.001
Gottlieb M, Russell F. How Safe is the Ultrasonographically Guided Peripheral Internal Jugular Line? Ann Emerg Med. 2018; 71(1):132-137. DOI: 10.1016/j.annemergmed.2017.08.047