An affordable and easily reproducible G-tube replacement trainer
Gastrostomy tubes (G-tubes) are used for nutrition, hydration, and medication administration in patients who have difficulty with oral intake. G-tube dislodgement is a common emergency department presentation, particularly in the pediatric population, since children are prone to pulling on their G-tubes and often do not understand the dangers of doing so.
The responsibility to replace a tube often falls on an emergency physician due to the urgency of replacement and is typically done without need for a specialty consultant.[1] A delay in replacement could allow a tract to narrow or close and could leave a G-tube dependent child without access to medications, nutrition, or hydration. Some parents are trained to replace G-tubes at home, [2] but may present to an emergency department if they have difficulty replacing the tube or lack the proper equipment at home.
Of note, if a G-tube becomes dislodged prior to tract maturity, approximately 4-6 weeks after initial replacement, it is advisable to consult a surgical service or a gastroenterologist prior to attempting replacement due to the increased risk of complications in an immature tract. [3]
Many learners are intimidated by this procedure due to the associated risks, potential unfamiliarity with G-tube set up and equipment, and the pressure of being watched by a nervous parent who may be more experienced in adjusting their child’s G-tube.
We find that procedural confidence and competence can be built through repetition and hands-on practice with unfamiliar equipment, so we set out to create an inexpensive trainer that could be used to practice G-tube replacement with learners.
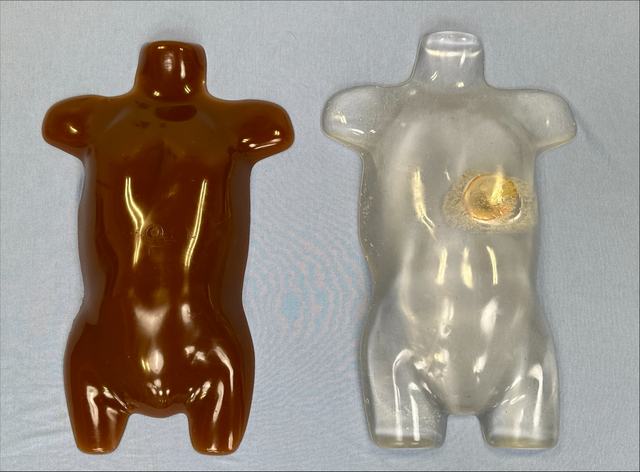
The trainer is made from ballistics gel and can be made in both clear and opaque versions. The clear model allows learners to easily visualize the tube passing through the tract into the stomach and can also be used to demonstrate creation of a false tract. The opaque model provides a more challenging and realistic option for when learners become more experienced.
Because it is made from ballistics gel, when the trainer becomes damaged, it can be melted and reformed into a new trainer. Our trainer can additionally be used to demonstrate confirmation techniques, such as aspiration of gastric contents and drainage to gravity, which are vital to safe replacement of G-tubes in the emergency department.[4] We also found that the trainer can demonstrate how balloon inflation in a false tract may be more difficult than in a properly placed G-tube.
This trainer can help physicians and physicians-in-training practice and fine-tune their G-tube replacement skills and position confirmation techniques. In this way, they can be more confident when replacing a G-tube in the clinical setting.
We were able to create the trainer for a total materials cost of approximately $130. As some of this cost is for reusable materials like the plastic form, subsequent trainers are even less expensive. Because the trainer is not intentionally cut or punctured during replacement, one trainer can last for multiple sessions. If any accidental tears or damages do occur, the ballistics gel can be heated to repair the site. The assembly portion takes <30 minutes. However, when including the time to melt and set the ballistics gel, the total time will take approximately 8 hours.
Materials (with costs as of Aug 7, 2024):
Clear Ballistics Extra Long Air Rifle Block 18 x 4 x 4 10% Ballistic $69.99 (enough to make x2 models)
Hollow Glitter Bouncy Ball (set of 2) – $8.49 (we were also able to find these at the Dollar Tree for $1.25 each)
Infant Size Plastic Mannequin Torso Form $13.49
Avanos, 0100-14LV, 14.0F, Avanos MIC Gastrostomy Feeding Tube $5.65
Dark Flesh Tone Silicone Pigment $16.90
x2 Home Depot paint mixing stick FREE
100-pack of Zip Ties $1.95 (only need x2)
5/16 in. x 48 in. Wooden Dowel Raw Wood Round Dowel $1.07
Gaffer Tape 1 inch (24mm) x 6 Yards Length $8.50
2-inch Binder Clips, pack of 12 (only need x2) $5.66
30-60 mL irrigation syringe and 5-10 mL Luer lock syringe – taken from our educational supply
Total for two trainers (clear and opaque): $131.70
Tools required:
Drill + 13/64 drill bit
Crock pot
Utility knife or scalpel
Assembly:
- Rip half of the ballistics gel block into small pieces (smaller pieces will melt faster). This will be enough ballistics to make one model.
- Turn on the crockpot to the highest setting in a well-ventilated area and add the ballistics gel pieces. Depending on your crockpot’s settings and size of pieces, it may take 3-4 hours for the gel to melt completely. You can check in on it every hour and stir with a wooden spatula until it melts completely.
- While the ballistics gel is melting, prepare the mold. The body form we used has 2 holes at the neck and groin region. Cover those holes with melt-proof tape, such as gaffer tape, so that the ballistics gel will not leak through.
- Position the mannequin torso so that it is level before you pour in the ballistics gel.
- We used a ~2-inch diameter toy plastic ball that was filled with water and glitter as the stomach. We used a scalpel to cut an 8 mm hole to drain and empty the ball. Once emptied, attach the wooden dowel to your paint stick using the zip ties and then insert the end of the wooden dowel through the hole in the plastic ball. It should be a snug fit.
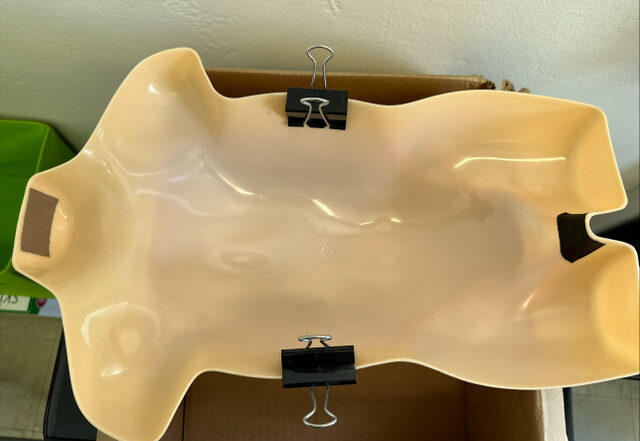
- Clip the binder clips to the sides of the mannequin torso as pictured.
- Slip the paint stick with the ball attached through the loops of the binder clips. Adjust the placement of the ball so that the bottom of the ball is about 6 mm away from the body form surface. Now the ball is stabilized for when you pour the ballistics gel in!

- If you are making the opaque model, add the silicone pigment to the melted ballistics gel prior to pouring it in the mold. Stir in and add pigment until you reach your desired color and opacity. Pour the fully melted ballistics gel into the mold. Allow the gel to cool and fully cure for a few hours, or overnight.
- Once cooled, disassemble the binder clips and wooden dowel, and remove the toy ball from the ballistics gel body. Remove the ballistics gel body from the mold.
- Use a 13/64-inch drill bit for a 14 French G-tube to make a tract in the area of the pocket made by the toy ball. Slide the G-tube in to make sure it fits through.
- Fill the toy ball with a liquid that mimics stomach contents. We recommend tea so that it is colored and can be seen through the clear version, but is not so opaque that you won’t be able to see the G-tube balloon inflation in the stomach.
- When placing the ball back into the ballistics model, make sure the hole of the ball and tract line up. Keep the ball upright so that the liquid does not spill out.
- Use a contrasting liquid to fill the G-tube balloon so that it is easy to visualize and distinguish from the rest of the stomach contents. We chose soy sauce! Now you are ready to demonstrate G-tube replacement.
- If you find that the tract is too loose or has ripped after multiple uses, you can melt down the ballistics again and repeat this whole process to make a brand-new trainer ready for use!
References
- Saavedra H, Losek JD, Shanley L, Titus MO. Gastrostomy tube-related complaints in the pediatric emergency department: identifying opportunities for improvement. Pediatr Emerg Care. 2009 Nov;25(11):728-32. doi: 10.1097/PEC.0b013e3181bec847. PMID: 19864965.
- Soscia J, Friedman JN. A guide to the management of common gastrostomy and gastrojejunostomy tube problems. Paediatr Child Health. 2011 May;16(5):281-7. doi: 10.1093/pch/16.5.281. PMID: 22547947; PMCID: PMC3114992.
- Shah R, Shah M, Aleem A. Gastrostomy Tube Replacement. 2023 Apr 17. In: StatPearls [Internet]. Treasure Island (FL): StatPearls Publishing; 2023 Jan–. PMID: 29494029.
- Lohsiriwat V. Percutaneous endoscopic gastrostomy tube replacement: A simple procedure? World J Gastrointest Endosc. 2013 Jan 16;5(1):14-8. doi: 10.4253/wjge.v5.i1.14. PMID: 23330049; PMCID: PMC3547115.