
Use this technique to clear away troublesome obstacles.
Ear canal foreign bodies commonly present to the emergency department. The first attempt at removal is the most likely to be successful, as repeated tries cause further swelling, bleeding and decreased patient cooperation.[1]
Additionally, the ear canal is extremely sensitive, as the skin provides little cushion over the underlying periosteum and this can make foreign body removal very painful. Being competent and proficient in removal of ear canal foreign bodies is important for patient comfort and safety.
There are numerous techniques for the removal of ear canal foreign bodies and most require fine motor skills. Some, such as the use of the Miller 0 laryngoscope for visualization, are less commonly known and practiced. Familiarity with these techniques allows a physician to select the one best suited for the removal of each unique foreign body. Practice in a low-stakes setting can help build confidence and skill.
Commercial ear canal simulators are available, but cost thousands of dollars.[2] These simulators seem to be designed primarily for making diagnoses with an otoscope, with few models geared toward removal of foreign bodies. Most are stationary and do not simulate patient movement or allow for patient positioning. A wearable model would potentially offer these training components. We set out to create a wearable, inexpensive, reusable ear model to allow practitioners to practice multiple foreign body removal techniques.

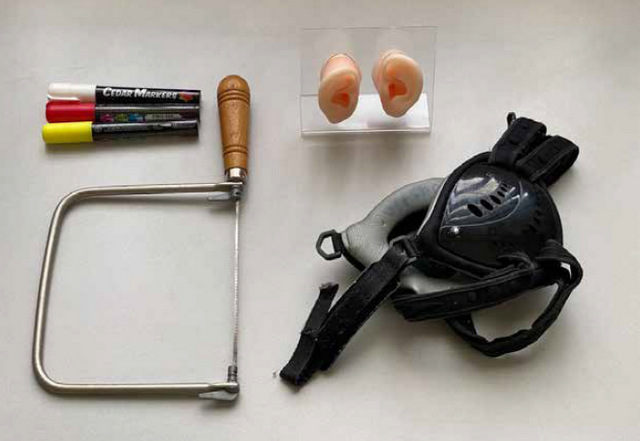
Required Items
- Chalk or paint marker — $6
- Jeweler’s saw — $12
- Silicone ears — $46
- Wrestling headgear — $29
Model Assembly
Step 1: Remove the headgear straps
Step 2: Mark holes on the headgear with a paint pen using the acrylic holder as a template
Step 3: Cut holes using the jeweler’s saw
Optional Step: Refine the cuts with sandpaper or a rotary power tool
Step 4: Place the silicone ear model in the headgear
Step 5: Replace the straps

Equipment for Foreign Body Removal Practice
- Ear curettes
- Alligator forceps
- Otoscope
- Miller 0 laryngoscope
- Ear hook
- Cyanoacrylate glue and long cotton-tipped applicators
- Various foreign bodies (legos, beads, popcorn kernels, button batteries, earring backers, etc.)
- 50 or 60 mL syringe
- 18 gauge IV catheter or 5 French feeding tube
- Tap water

Ear Foreign Body Removal Practice
Simulation Headgear for Retrievals in the Ear Canal’s (S.H.R.E.C.) wearability allows the practitioner to think through patient preparation and positioning. The simulation session allowed us to discuss choice of technique and let learners experience and adapt to obstacles.
Here’s a video of S.H.R.E.C. in use: https://youtu.be/CEvFHvhNBQ0.
Patient positioning
- The “Superhero Cape Burrito”
When concerned about patient cooperation, this technique may be employed to restrain movement. The Superhero Cape Burrito involves slipping a pillowcase onto the patient’s extended arms behind their back and then wrapping their entire body tightly in a sheet, as if swaddling an infant.[3]
- Head positioning
This is determined by the chosen technique, but the patient will often be positioned supine, with the affected ear up. When performing the irrigation method, the affected ear is tilted to the side, with the basin resting below the ear to collect irrigation fluid.
- Equipment positioning
This includes gathering and positioning equipment and lighting. If a video laryngoscope is used, we found that positioning it on the contralateral side of the gurney allowed for best visibility.
Removal techniques
- Instrumentation under direct visualization using a Miller 0 laryngoscope blade
Instrumentation can be painful and frequently warrants procedural sedation in young children or other uncooperative patients. Soft objects, those with protruding surfaces or irregular edges and insects may be removed with alligator forceps. Objects that are round or breakable can be removed using a right-angle hook, angled wire loop or angled curette that is slowly advanced beyond the object and carefully withdrawn.
Holding the Miller 0 blade in your non-dominant hand, carefully insert the blade along the superior anterior portion of the external canal and gently lift up to open and illuminate the canal. Use your dominant hand to extract the foreign body using the chosen instrument.
- Irrigation
Before using this method, consider the foreign body. Irrigation is contraindicated in patients with tympanostomy tubes or perforated tympanic membranes; for the removal of vegetable matter (such as a bean) due to its potential to absorb water and swell; and for the removal of button batteries in which water may enhance current flow and increase the potential for caustic injury to the canal.
Insert the IV catheter approximately 1-1.5 cm into the ear canal while visualizing the foreign body, taking care to insert the tip of the catheter beyond the foreign body. Then briskly depress the syringe and repeat until the foreign body is expelled. In some cases, the foreign body may be moved toward the auditory meatus without being fully expelled, at which point instrumentation may be useful to fully remove the object.
- Cyanoacrylate glue adhesion
Cyanoacrylate adhesive (such as Dermabond®) has been used to remove wedged, smooth, round foreign bodies.[4]
Apply a small amount of cyanoacrylate to the blunt end of a cotton swab and then carefully insert it into the ear canal, placing it into contact with the foreign body. The glue takes approximately 60 seconds to bond and it is crucial for the swab and child to remain still during this time. Take care to avoid contact between the glue and the skin lining the ear canal. If the swab becomes bonded to the skin, acetone can be used to dissolve the bond.
For a visual guide to building S.H.R.E.C”, check out tinyurl.com/2fyh57dr.
References
- Davies PH. Foreign bodies in the nose and ear: a review of techniques for removal in the emergency department. Emergency Medicine Journal. 2000;17(2):91-94. doi:10.1136/emj.17.2.91
- Ear Examination Simulator II. Accessed April 19, 2021. https://www.gtsimulators.com/products/ear-examination-simulator-ii-kk-mw12
- Brown JC, Klein EJ. The “Superhero Cape Burrito”: a simple and comfortable method of short-term procedural restraint. J Emerg Med. 2011;41(1):74-76.
- Isaacson G. Two-stage removal of an impacted foreign body with an epoxied anchor. Ann Otol Rhinol Laryngol. 2003;112(9 Pt 1):777-779.
2 Comments
Hello authors – this is interesting. I am trying to make a model to practice removal of ear FBs by Emergency Physicians and as you say comercial models are very expensive. Can I ask where you source your silicone ears from and would these be generally available. I work in Rotorua in New Zealand.
Many thnaks,
Peter
We got them on Amazon. There’s a link in the pdf that is linked at the bottom of the article: http://www.amazon.com/dp/B085Q48877. Hope that helps!