While interosseous (IO) access is not a new topic, its use in adults is still not widely utilized. I cannot count the number of times I’ve seen individuals struggle for peripheral or central access in an unstable patient when all they really need are a few seconds and an IO device. Several adult IO devices have hit the market in the past few years, and in my opinion the cream of the crop is Vidacare’s EZ-IO. It is faster and easier to insert than a Jamshidi and has more control than a BIG. If you can handle an electric drill then you can use an EZ-IO.
The standard approach with adult IO needle insertion is to find the flat portion of the tibial plateau and insert the needle. While this is usually the fastest and easiest option it is not always available. The tibial approach should be avoided if there is overlying infection, trauma or recent orthopedic intervention in close proximity to the insertion site, fracture of the tibia, inability to locate landmarks, or significant trauma above the level of the tibial insertion site. If any of the above are the case you must look for alternative approaches. With the EZ-IO this leaves you three options: sternum, malleolus, and humerus.
The sternal approach allows ready access but due to the decreased soft-tissue and thin structure of the sternum you must use a manual driver instead of the power driver that makes the EZ-IO so great. The malleolar approach is an alternative to the tibia but brings with it the same issues.
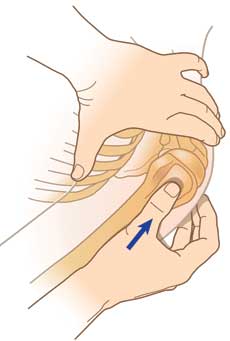
This leaves us with one last IO option for access; the humeral approach. I like to use the humeral approach in unstable trauma patients with severe lower extremity or pelvic trauma where I worry that fluids put through lower access may not make it to the heart. The IO then buys us time for better access. Identifying landmarks is similar to the tibia with one big exception–instead of finding the tuberosity and coming off to the flat portion along side it you find the greater tuberosity of the proximal humerus and drill directly through it.

Once located it is time to place the IO. The area should be prepped as any other IV site. The needle is then placed directly on the greater tuberosity. If you are going to hedge your bets, err on the lateral side since the neurovascular bundle lies medially. You don’t want to save your patient only to be sued for the loss of use of their extremity (not that I’d know anything about that). A little pressure and squeeze of the trigger and you will get the sensation of a hot knife going through butter. Once you drill through the bone you will get a quick sensation of give and Voila! You have access. A quick flush and flash to verify placement and you’re done. As with any IO you need to be sure to secure it, but humeral IO’s are particularly tenuous due to the thinner bony cortex of the humerus in comparison to the tibia. So be extra careful.
Don’t let this lengthy description of the procedure fool you; placing an IO needle is quick work. A whir to left and right and you have dual access. Hook up the hoses on pressure bags and you can have two liters in in minutes.
Keep in mind that while placement of the IO causes a surprisingly small amount of pain, any injection is painful. This can be mitigated by initially injecting a few CC’s of lidocaine. Be sure to use cardiac lidocaine and not SQ lidocaine as typical SQ lidocaine is not IV compatible. The IO can basically be used as an IV for medications and lab withdrawals. With increasing ED overcrowding keep in mind that IO needles are not to be left in place for more than 24 hours. To remove the needle simply screw a syringe on the end and pull directly back maintaining a 90 degree angle to the skin. Do not rock or wiggle the needle out.
Follow TheTechDoc on Twitter!
Watch the video demo by the Tech Doc.
5 Comments
FYI. If trying to watch the large video be aware that it hangs part-way through playback but will pick up given enough time.
TechDoc,
Thanks for the support and for posting the excellent information!
Steven Dralle, LP
Sorry about that, I thought the post would show I was from Vidacare. If anyone needs any more information, don’t hesitate to ask.
Steve Dralle
EZ-IO by Vidacare
Can you use the BIG interosseous device the same way for the humerus, and medial malleolus approaches? The only reason I ask if administration winds up choosing the BIG instead of the vidacare EZ-IO. I would still hesitate to use the sternal approach with any I/O device.
I don’t know the specifics of the BIG for humerus or malleolus use but having used it in the tibia in the past I’d be hesitant to use it elsewhere as it is a large amount of force. You really have to put your weight behind it or it simply bounces back into your hand.