When the adrenaline is pumping, perform a bedside, point-of-care ultrasound to help avoid costly errors.
“Hey doc, we have multiple traumas coming in at once. There was a large rollover on the freeway and we are the closest trauma center. We are going to need your help in the trauma bay. We are taking the five most critical ones from the scene.” You have barely had a chance to log into the computer and put your bag down, but you remember that you are the team captain and your mood is going to set the pace for what could be a really challenging night for everyone.
You grab your stethoscope, a couple of 14 gauge needles, a scalpel and your ultrasound machine. Besides some gum and duct tape, what else could a girl need?
As you enter your trauma bay, you are thankful that one of your favorite trauma surgeons is on duty with you and the two of you decide to divide and conquer. You decide to take patient’s 2 and 4 with your team of emergency medicine residents.
Your trauma bay doors open with a whoosh and all five patients arrive at once. The teams descend upon them like starving wolves, except with the intention to heal instead of devour. Within minutes patients are intubated, central venous access has been secured, and one of the patient’s is undergoing a potentially life-saving clamshell thoracotomy. “I need a chest tube over here!” one of your junior residents exclaims. You look over to see that he has prepped the patient’s chest and is getting ready to place an emergent right-sided chest tube. You calmly walk over to the patient’s bedside and glance at the portable chest x-ray that was just taken.
“Great job picking up that hemothorax on chest x-ray. Show me the interspace where you are going to place the chest tube.”
Your senior resident places his finger correctly in the 5th intercostal space based on his assessment of anatomic landmarks on the patient. “What is directly under your finger and the interspace above it?” you ask innocently.
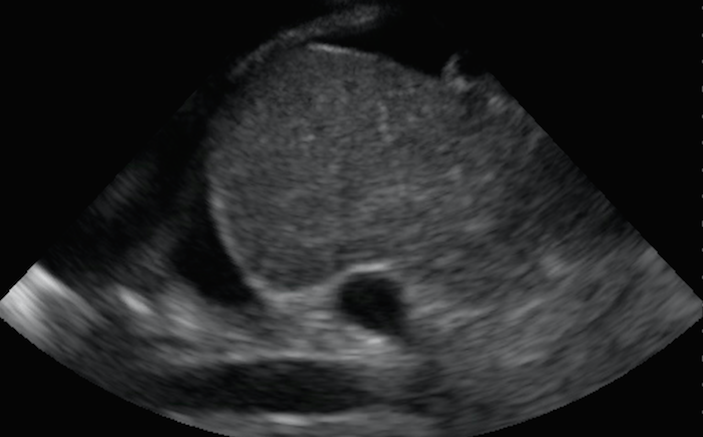
Before your resident can finish summarizing the findings and interventions so far, you have wheeled over the ultrasound machine and have placed the probe at the interspace he was intending to enter (Figure 1: 5th Intercostal Space – above). You slide the probe up the patient’s chest and show him what you see two interspaces above (Figure 2: 3rd Intercostal Space – below). What do you see on bedside ultrasound? What should your resident do?

You understand that your resident’s EQ is inversely related to the number of people watching him, so you jump in and seize the opportunity to teach all those who have gathered around. You point out that this particular patient’s diaphragm was elevated and a chest tube placed in the traditional 4th to 5th intercostal space may have injured his diaphragm or liver (Image 3 – below). As you scanned around the chest, your team can see that there is a lower likelihood of hitting the diaphragm or the liver if you enter the chest a couple of interspaces higher (Image 4 – below).


As your emergency medicine resident successfully inserts the chest tube, you repeat the ultrasound of the patient’s abdomen and notice that he is developing more intra-abdominal free fluid. Given the situation, your trauma surgery colleague decides to call in additional reinforcements and 4 of the 5 trauma patients are taken to the operating room expeditiously.
Once the dust settles, you describe the 9 P’s you want your team to remember from the shift: Proper Planning and Practice Prevents Piss Poor Performance + Probe (with ultrasound) before you Poke.
Pearls & Pitfalls in Performing an Ultrasound Guided Chest Tube Thoracostomy
- Point-of-care, bedside ultrasound can be used to diagnose intra-thoracic fluid and to guide drainage of the fluid.
- Use a low-frequency transducer to visualize the thoracic cavity and it’s contents. It is often helpful to utilize probes with a smaller footprint so that you can maneuver the probe in between the ribs.
- Scan systematically and identify important landmarks and structures. When you are about to place a chest tube, it is useful to visualize the hyperechoic lung parenchyma floating in the anechoic or hypoechoic fluid, the diaphragm, and any adjacent organs (liver, spleen or heart).
- Remember that the position of organs can change based on the patient’s past medical and surgical history, and the clinical scenario at hand.
- Use ultrasound to map out and localize the safest place to enter the patient’s thoracic cavity prior to placing a chest tube. You may find that it is better to enter more posteriorly and a couple of interspaces above where you anticipated.
- A chest tube can be placed via dynamic ultrasound guidance if extra hands are available.
- If extra hands are not readily available, localize and mark where it is safest to enter the patient’s thorax and proceed with the thoracostomy in a standard, sterile fashion.
- There is no substitute for hands-on practice. Build the necessary muscle-memory by performing and practicing point-of-care ultrasound as much as possible.
- Stay up-to-date on the most recent point-of-care ultrasound advancements and educational opportunities by visiting www.SonoSupport.com.