A cheaper alternative to commercial knee arthrocentesis models.
Picture this: you are a resident working in the emergency department in the middle of a busy shift. You find yourself staring at an angry knee joint that demands to be accessed. It’s swollen, painful and you’re worried about septic arthritis.
The orthopedist wants to know cell counts and you need to check for crystals to help differentiate between gout and infection. Or maybe you see a laceration that is just a little too close to the joint for comfort, and you want to load the knee with saline to determine whether the capsule is still intact.
Maybe it’s a large traumatic hemarthrosis and you want to relieve the pain. There are several reasons that require you to insert a needle into a knee joint, but it can be an intimidating procedure, especially early in your career. You have a needle and syringe in hand, and you start to wonder if reading about the procedure or watching that YouTube video was enough to successfully perform this procedure. Ideally, you’d like a chance to increase your confidence with the procedure before you must perform it in an emergent situation.

Knee arthrocentesis can be learned by reading a textbook, watching videos or working with cadavers. The problem is that reading is easy to misinterpret, videos fall short of conveying a sense of reality and cadaver labs are expensive. Synthetic knee models can be purchased, but they’re also expensive, ranging from hundreds to thousands of dollars. That is why we developed an inexpensive, reproducible trainer that can be easily reused by multiple learners. The trainer is ultrasound compatible, has palpable anatomic landmarks, a flexible knee joint and can even be used to practice saline arthrogram.
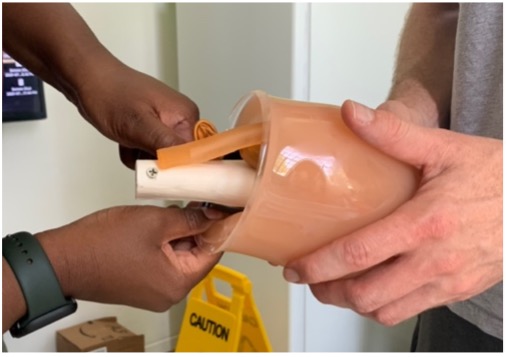
The base of the trainer is a plastic anatomical knee model. We filled a balloon with water and secured it under the patella to simulate the joint capsule and synovial fluid. Eighteen-inch balloons proved to be most useful, as they did not burst as easily as smaller balloons under the pressure of the patella and could be reused a few times before replacement.
Additionally, it was helpful to fill the balloon only partially with water, as filling it completely caused leakage and prevented it from fitting correctly in the joint. We found that 100 mL was a good amount of water to add to the balloon, but this doesn’t need to be exact. The balloon was replaced when it started to leak or no longer contained enough water to properly aspirate.

We experimented with using a small-sized plastic bag and a nitrile glove with the fingers tied in place of the balloon. While these worked to some extent, they leaked sooner than the 18” balloon and didn’t fit into the joint as well. Adding yellow or red food coloring to the water inside the balloon can more accurately replicate infected or bloody synovial fluid.
To simulate skin, we melted about 36 ounces of ballistics gel in an electric slow cooker with dye for approximately three hours. Once completely liquified, we poured the gel into a 11.2” x 15.7” baking pan and let it cure overnight. We then cut the resulting sheet of gel in half, yielding two strips of “skin” for our model that were approximately 5.6” by 15.7”. The ballistics gel seals balloon punctures, extending the life of each reset. To wrap the “skin” around the model, we simply overlapped the gel so that it stuck to itself. The amount of gel we used gave us skin that was opaque and thick, so you can use less gel if you’d like it to be thinner. The gel can be re-melted as re-used as needed.

The simplicity of our model makes it ideal for repeated use and easy reset. A single balloon should last for three or more aspirations, and then can easily be replaced by unwrapping the overlying skin. The “skin” should slightly overlap itself; this allows the aspiration position to be periodically changed to avoid too many needle perforations in the same location. The trainer allows for practice of the medial, lateral, superior, and inferior approaches to knee arthrocentesis.
To practice saline arthrogram, we first created a laceration in the ballistics gel “skin” and surrounded the laceration with superglue. We then laid the knee joint with the balloon in place onto the skin so that only the balloon touched the glue. Once dry, we wrapped the skin around. Next, we sliced a small hole into the balloon through the laceration, so that any water leaving the balloon would leak from the hole. At this point, the joint was ready to use and infuse with saline.
Our knee aspiration trainer is an easy and inexpensive option to practice knee arthrocentesis and saline arthrogram. We hope it will make practicing these procedures more accessible. To watch the assembly and use of our model, check out a short video we made at this link: youtu.be/faXJtSYf34s.
Special thanks to the Laboratory for Innovations in Medical Education (LIME) at Loma Linda University School of Medicine.
Supplies:
- Anatomical knee joint model: amzn.com/B00KZO8GES ($43.99)
- 18” balloons: amzn.com/B07CNPHRCD ($13.79 for pack of 30)
- Ballistics gel: amzn.com/B0108CHZXY (only need about $10 worth)
- Ballistics gel dye: com/product-category/dye/ ($29.98)
- Rimmed baking sheet with at least 1” height: amzn.com/B08G89S1J7 ($16.97)
- Superglue: amzn.com/B000H5SFNW ($1.97)
- Scalpel: amzn.com/B08LTZY4ST ($4.49)
- Scissors
- Water
Total ~ $121.19

Assembly:
- Make the skin by melting 36 oz of ballistics gel and desired amount of dye in an electric slow cooker and heating for approximately 3 hours, or until completely melted.
- Pour the melted ballistics gel into the baking pan and allow it to cure overnight.
- Cut the cured gel into approximately 5.6” by 15.7” strips, or whatever width adequately covers the knee joint.
- Make the joint capsule by partially filling a balloon with water (around 100 mL) and tying it off. Be sure to not fill completely to prevent leakage and to allow for multiple uses.
- Assemble the model by placing the filled balloon under the patella, wrapping the ballistics-gel skin around the joint, and securing it by overlapping.
- For saline arthrogram practice, create a laceration in the ballistics gel skin.
- Apply superglue around the laceration on the surface that will face the model.
- Secure the balloon beneath the patella and place the model on top of the ballistics gel skin, making sure that only the balloon is touching the superglue.
- After superglue dries, wrap skin around the joint and secure by overlapping.
- Use a scalpel to create a small hole under the laceration.