Utilizing a life-casted soft tissue foreign body removal trainer
Managing soft tissue foreign bodies (FB) in the emergency department (ED) can be unsatisfying. Many emergency physicians (EPs) prefer not to attempt non-emergent removal and instead refer the patient for a more controlled removal, especially when the foreign body is deep or located near sensitive structures.
Regardless, it’s important for EPs to be able to detect FBs so patients can either be managed in the ED or appropriately referred to receive the treatment they need. Plain radiography, computed tomography and even MRI are limited in their ability to detect soft tissue foreign bodies. [1]
Ultrasound is surprisingly capable of picking up soft tissue foreign bodies that other modalities might miss. [2] Most EDs have portable ultrasounds available, which makes point of care ultrasound a valuable and time-efficient form of imaging. In the case of extremity FBs, a water bath is an especially helpful ultrasound medium. [3]
It allows the user to put distance between the probe and the patient’s injury, which helps visualize more superficial structures and reduces patient discomfort. [3,4] As with any procedure, practice in a simulation environment can be helpful, [5–7] but a prerequisite for practicing water bath ultrasound is an extremity with a FB. This makes it difficult to include water bath ultrasound as part of any training curriculum.
View this post on Instagram
Ballistic gel has similar echogenicity and density to human soft tissue. This material is great for trainers since it can be used to practice ultrasound. [8,9] When the model becomes unrecognizable from too many procedure attempts, it can simply be remelted and remolded. This makes ballistic gel an adaptable and cost-effective choice for FB trainers.
Have you ever wondered how Hollywood makes life-like fake limbs? They use a process called “lifecasting.” [10] This is where a moldable material is painted on a living person to create a 3D mold known as a “lifecast.” Silicone works well for lifecasting because it’s readily available and easy to apply. It’s often used for baking molds since it withstands high temperatures. This makes silicone perfect for ballistic gel molds, because some ballistic gels typically melt at temperatures higher than 200°F. This allows molds to be reusable and sturdy while providing great detail.
Another material that can be used to lifecast is aluminum foil. As a pliable yet sturdy, heat-resistant material, we’ve used aluminum foil to quickly create a ballistic gel mold. It’s simple, affordable, and effective. However, the model lacked realism and required additional refinement after the ballistic gel cooled (Figure 1).
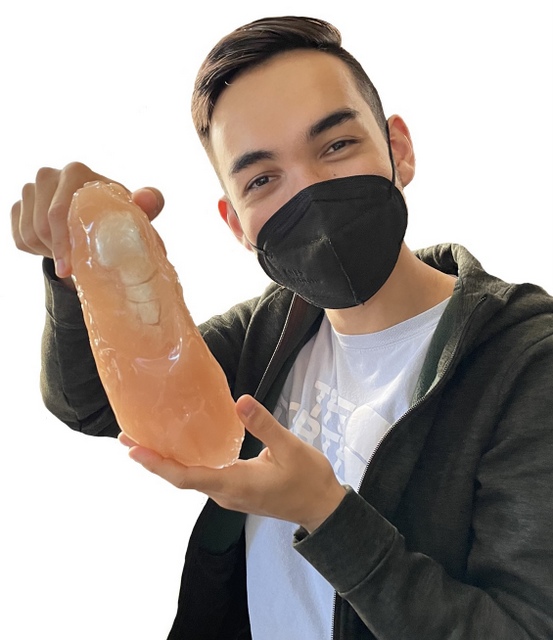
We made a trainer using silicone lifecasting and ballistics gel to be able to identify and practice removing soft tissue extremity foreign bodies (Figure 2).
We used a ballistics gel trainer from an aluminum mold to teach fourth year medical students water bath ultrasound and FB removal at the end of their emergency medicine rotation. We refined our lifecasting technique using a more realistic ballistic gel trainer made from a silicone mold. Both trainers provided positive learning experiences.
We’ve found that the realism of the lifecasted foot inspired new applications for simulation. One of these was the treatment of hair-thread tourniquet syndrome. This is a very painful condition that occurs when a hair wraps around the finger or toe, typically of a young child. [11] It is important to remove the constricting hair quickly to prevent further damage like ischemia, amputation, and even bone erosion. [12] Our lifecasted foot model prepares learners to take action quickly and confidently when patients present with a hair tourniquet.
The lifecasted ballistic gel trainer from a silicone mold was used to demonstrate the technique of using a cutting needle to remove a hair-thread tourniquet. 13
If the time and resources it takes to make a lifecasted foot are too intense, another option is to purchase a commercially available premade ballistics gel model. [14] However, we’ve found silicone lifecasting to be fun and cost-effective in the long run since the model is remoldable. You can make multiple editions of the same foot model with the same remelted ballistics gel, foot skeleton, and silicone sock without any extra purchases. If you’re making multiple models, you can use the same mold. Learning the process of lifecasting will also allow you to create new trainers for other procedures.
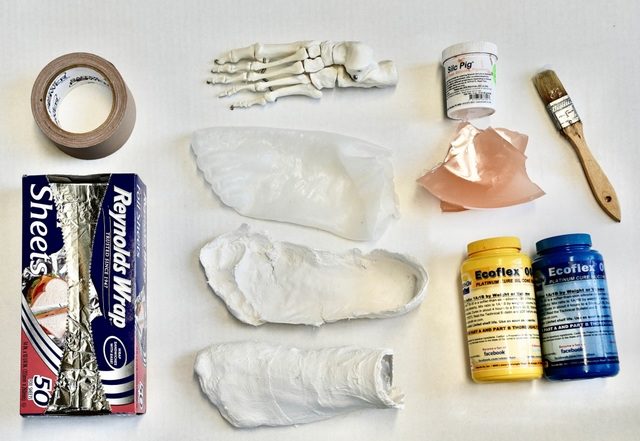
The Laboratory for Innovations in Medical Education recommends the following core materials when starting to explore creating various DIY trainers: heat resistant gaffer tape, ballistics gel, and a slow cooker. Additionally, while ballistics gel dye is not required for the trainer to be effective, we find the increased opacity and lifelike colors result in a more realistic simulation experience. While these materials are an initial investment, these core materials are seen throughout multiple Train Yourself articles and can act as a starting toolkit for individuals seeking to start innovation labs.
Steps for Life-Casting with Silicone and Plaster of Paris
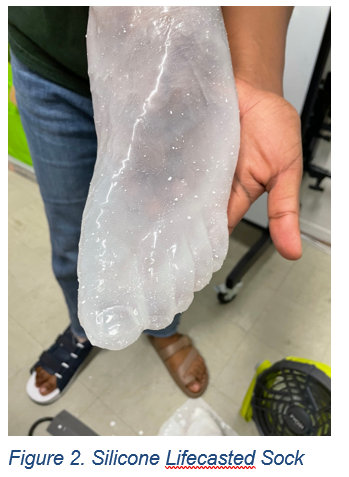
- Start by creating a silicone sock by selecting a model whose foot closely matches the size of the anatomic skeleton.
- Apply Vaseline to the model to prevent the silicone “sock” from sticking too tightly to the model. 15
- Mix together one to one parts A and B silicone rubber liquid, or follow the instructions given on the package.
- Create the silicone sock by painting on silicone layer by layer. Make sure to allow time for each layer to cure before applying the next.
- Once the surface is fully covered in silicone and the silicone has had time to cure, create a support shell by applying plaster of paris in two sections while the silicone sock is still on the foot. First apply plaster of paris over the top of the foot and allow it to fully harden.
- Apply Vaseline around the edges of the top section of the support shell, then begin applying plaster of paris to the bottom of the foot. Make sure there is overlap between the two sections.
- Once the top section of the support shell fully hardens, separate both sections of the support shell. Then remove the silicone sock from the foot.
- Once the first five steps have been completed, begin heating the ballistic gel in a crock pot in a well-ventilated area. Preheating the ballistic gel ensures it will be ready to pour into the mold as soon as possible.
- Begin preparing the mold for ballistic gel by inserting the anatomic foot skeleton into the silicone sock.
- Place the silicone sock containing the foot skeleton in the bottom section of the plaster support shell. Make sure to align the toes of the silicone sock with the proper indents in the plaster.
- Fit the top of the support shell into the bottom piece and pull the upper edges of the silicone sock up over the top of the support shell.
- Wrap the support shell in aluminum foil taped down with heat resistant tape (we used gaffer tape) to ensure the plaster support shell stays in place.
- Create a cuff to make sure the silicone sock does not slip down into the plaster support shell by folding aluminum foil into a rectangular strip.
- Pull the upper edge of the silicone sock over top of the support shell. Tightly wrap the rectangular strip of aluminum foil around the opening of the plaster on the inside of the silicone sock while firmly folding about a third of the width of the strip over the edge of the support shell and silicone sock. This sandwiches the silicone sock between the support shell and the aluminum foil.
- Secure the foil cuff with gaffer tape and attach the cuff to the rest of the aluminum foil shell.
- Once the mold has been secured, balance the mold on a heat resistant object (like a baking tin) so that the heel is elevated, and the toes are sloping down towards the ground. This use of gravity ensures that any smaller crevices of the mold seen will receive an adequate amount of ballistic gel and that any air bubbles will float to the top of the mold.
- Carefully pour the hot ballistics gel into the mold.
- Allow the ballistics gel to cool, then cut off the outer layer of tape and aluminum foil.
- Carefully remove the plaster support shell and silicone sock and save for reuse.
- You’re now ready to practice waterbath ultrasound and foreign body removal! (Figure 5)

Steps for Aluminum-Casting
- Select a volunteer model whose foot closely matches the size of the anatomic skeleton, for the foot and have them place their foot on a flat surface.
- Apply a thin layer of foil to the top of the model’s foot and press into the creases around the toes (Figure 6.). The piece of foil should be large enough to cover the dorsal aspect of the model’s foot, loop around to and cover the ankle, and form a skirt of foil on the floor after molding it around the model’s foot. The “seam” of the mold should line up along the Achilles tendon.
- Apply additional layers of foil while pressing into the natural contours of the model’s foot. Do this repeatedly until the mold is about 5 mm thick.
- Stabilize the resultant mold with gaffer tape on the dorsal aspect of the foot.
- Have the model lift their foot and apply a layer of foil to the bottom of their foot, pressing into the natural creases. Apply additional layers of foil, similar to step 3.
- Peel the mold away from the bottom of the model’s foot and then from the “seam” at the back. This should result in two separate pieces.
- Place the skeleton foot on the mold of the bottom of the foot and cover it with the mold of the top of the foot. Wrap the overhanging “skirt” of foil under the bottom half to secure the two pieces together. Close any gaps by folding the foil before ultimately stabilizing it with Gaffer tape.
- Heat enough ballistics gel to fill the mold in a slow cooker on the “high” setting until it is fully melted into a thin liquid.
- Prop the heel of the mold up on a block or other solid item then ensure that the skeleton foot is centered before carefully pouring in the ballistic gel.
- Allow the foot to cool while propped up before unwrapping it from the foil and gaffer tape mold.
Required Core Materials for DIY Trainers and Innovation Toolkit
| Item | Link | Price |
| Ballistic Gel | https://www.clearballistics.com/shop/10-ballistic-gelatin-fbi-block/ | $90 |
| Slow Cooker | www.amzn.com/B003OAJGJO/ | $40 |
| Ballistic Gel Dye | http://humimic.com/product-category/dye/ | $34 |
| Aluminum Foil | www.amzn.com/B005GPJCHQ/ | $3 |
| Heat Safe Tape | www.amzn.com/B00GZE3UJ8 | $20 |
| Total | $187 |
Required Materials for Life-Casting with Silicone and Plaster of Paris
| Item | Link | Price |
| Anatomical Foot Skeleton | www.amzn.com/B08MXQXFZP | $30 |
| Ecoflex 00-35 FAST Silicone | https://shop.smooth-on.com/ecoflex-00-35 | $40 |
| Paint Brush Pack of 24 | www.amzn.com/B078XJZGNN | $12 |
| Vaseline Pack of 2 | www.amzn.com/B01M1V84CY | $5 |
| Plaster of Paris Pack of 12 | www.amzn.com/B0057FDDQ6 | $24 |
| Final Price | $81 |
References
- Ingraham CR, Mannelli L, Robinson JD, Linnau KF. Radiology of foreign bodies: how do we image them? Emerg Radiol. 2015;22(4):425-430.
- Manthey DE, Storrow AB, Milbourn JM, Wagner BJ. Ultrasound versus radiography in the detection of soft-tissue foreign bodies. Ann Emerg Med. 1996;28(1):7-9.
- Blaivas M, Lyon M, Brannam L, Duggal S, Sierzenski P. Water bath evaluation technique for emergency ultrasound of painful superficial structures. Am J Emerg Med. 2004;22(7):589-593.
- Website. Lewis, D., Jivraj, A., Atkinson, P., & Jarman, R. (2015). My patient is injured: identifying foreign bodies with ultrasound. Ultrasound: Journal of the British Medical Ultrasound Society, 23(3), 174. https://doi.org/10.1177/1742271X15579950
- Hinchcliff M, Kao M, Johnson K. The importance of technical skills assessment during an airway foreign body removal course. Int J Pediatr Otorhinolaryngol. 2019;117:1-5.
- Clark MPA, Westerberg BD, Mitchell JE. Development and validation of a low-cost microsurgery Ear Trainer for low-resource settings. J Laryngol Otol. 2016;130(10):954-961.
- Clark MPA, Nakku D, Westerberg BD. An endoscopic Ear Trainer for the low-resource setting. J Laryngol Otol. 2019;133(7):571-574.
- Morrow DS, Broder J. Cost-effective, Reusable, Leak-resistant Ultrasound-guided Vascular Access Trainer. J Emerg Med. 2015;49(3). doi:10.1016/j.jemermed.2015.04.005
- Morrow DS, Cupp JA, Broder JS. Versatile, Reusable, and Inexpensive Ultrasound Phantom Procedural Trainers. J Ultrasound Med. 2016;35(4):831-841.
- LIFECAST English Definition and Meaning. Lexico Dictionaries | English. Accessed July 23, 2022. https://www.lexico.com/en/definition/lifecast
- Claudet I, Pasian N, Marechal C, Salanne S, Debuisson C, Grouteau E. Hair-thread tourniquet syndrome. Archives de Pédiatrie. 2010; 17 (5):474-479. doi:10.1016/j.arcped.2010.02.012
- Mat Saad AZ, Purcell EM, McCann JJ. Hair-thread tourniquet syndrome in an infant with bony erosion: a case report, literature review, and meta-analysis. Ann Plast Surg. 2006;57(4):447-452.
- Lin M. Trick of the Trade: Hair tourniquet release. ALiEM. Published June 5, 2012. Accessed August 13, 2022. https://www.aliem.com/trick-of-trade-hair-tourniquet-release/
- Ballistics Gel Foot. Ballistic Dummy Lab. Accessed July 17, 2022. https://ballisticdummylab.com/products/ballistics-gel-feetpair
- How To Make a Silicone Mold of a Hand – Ecoflex® 00-35.; 2015. Accessed July 21, 2022. https://www.youtube.com/watch?v=gndV6rMzR_4
Photo Credit: Laboratory for Innovations in Medical Education (LIME)