Use this approach to ensure proper identification and placement of IVs.
The charge nurse walks over to your workspace and tells you, “The patient you just saw in bed 3 still needs an IV. Our nurses have tried both arms and still aren’t able to get a line. Can you put one in?” You recall the patient’s history of intravenous (IV) drug use and frequent hospitalizations and realize an ultrasound-guided peripheral intravenous (PIV) line will be needed.
You tell your nurse that you’ll be in to help and start to gather your supplies. You grab the ultrasound machine with the linear probe attached, a sterile ultrasound probe cover, an angiocath, a J-loop, single-use sterile gel, a tourniquet, sterile skin prep, a transparent film dressing and a flush.

Basic supplies, needle for an ultrasound-guided IV placement.
Set up your supplies at the bedside and explain to your patient what you’re going to do. He’s agreeable and interested in watching your procedure. After applying a tourniquet and scanning his forearm, you locate a vessel and confirm it’s a vein by compressing it and watching the walls touch.

The image on the left shows compression with the anterior and posterior walls, easily touching with pressure administered by the probe.
Center the vein in your image and insert the angiocatheter at the middle of the probe into his skin, just over the vein. The needle is then directed towards the vessel, with the probe following the needle tip. You get a flash of blood and confirm you are in the center of the vessel, visualizing a target sign (Image 3).

The “target sign” is used to describe the appearance of the needle tip within the center of the vessel.
The catheter advances easily over the needle; you confirm placement with a flush, and you secure the line with an adhesive dressing. Your nurse and patient are happy, and you head back to the workroom after you disinfect the probe.
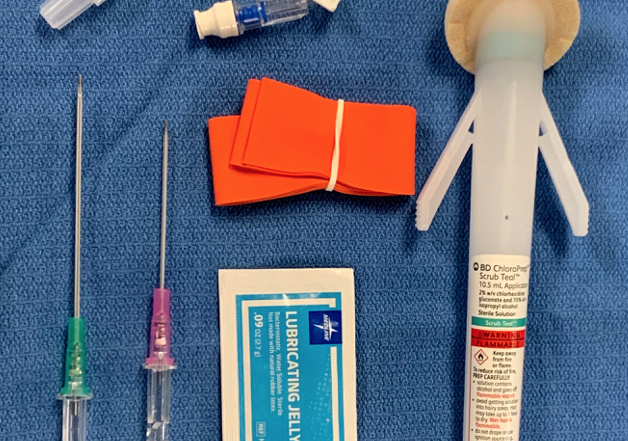
Equipment needed, setting up for an ultrasound-guided PIV:
The equipment commonly used for an ultrasound-guided line is shown in Image 1. Use a high-frequency linear probe and a tourniquet to help dilate vessels, thereby making it easier to cannulate the vein. Single-use sterile gel is advised over the multi-use bottles.
Both ACEP and the American Institute in Ultrasound Medicine (AIUM) have advocated for using single-use probe covers. The use of single-use gel, a probe cover, and sterile skin prep decrease infection risk. A full sterile set-up, such as used in central lines, is not needed.
Potentially most important is utilizing a longer-length catheter than what is commonly employed for a classic landmark-based IV line. The deeper the vein, the higher the chance the IV line will infiltrate if not enough catheter is secured within the vessel.
Since deeper vessels are frequently targeted, increased length catheters are important to secure enough of the catheter in the vein safely. This will prevent the catheter from slipping out of the vein with any movement or infusion and prevent infiltration. A 2.5 inch (6.4 cm) catheter is a common longer length stocked in many departments.
Given that placement requires fine motor skills, getting in a position of comfort with the ultrasound screen in your field of view is important. This simple step will allow for increased rates of successful cannulation.
Vein confirmation:
A vein is a thin-walled, low-pressure structure that should be easily compressed with gentle pressure applied by the ultrasound probe. Care should be taken because arteries can also be deformed or compressed if the patient is hypotensive or enough pressure is applied. However, pulsations are often still visible. Color flow, or Doppler, can be utilized if there is any uncertainty. Avoid a nerve if near your target vessel; it appears as a honeycomb structure and frequently travels with an artery and vein (Image 4).

Commonly, an artery, vein, and nerve travel together; be aware of your surrounding structures.
Technique for performing the procedure:
Identify an appropriate vein. The magic numbers for a perfect vein for ultrasound guidance are 0.3-1.6 cm deep and > 0.4 cm in diameter. This allows for enough depth to easily see the vein and needle with the ultrasound probe and a large enough vessel to cannulate with a catheter. Start in the forearm and scan proximally until a suitable vessel is found.
Once a target is identified, plan out the trajectory of the needle in relation to the vessel and the ultrasound probe. While both long and short axis approaches are options, we recommend using a short-axis approach (particularly as this skill is learned) as this gives the highest success rate. Basic geometric principles and the Pythagorean theorem can be employed. The depth to the center of the target vein is identified, the skin is then punctured that same distance away from the probe at a 45-degree angle.
As an example, if the center of the vein is 1 cm deep, then the skin is punctured at a 45-degree angle approximately 1 cm distally. Once the needle superficially punctures the skin, the probe then slides toward the needle to identify the bright, echogenic foci of the needle tip. When the tip is identified, the probe is slid away from the needle very slowly until the echogenicity disappears. The needle is then advanced further until it shows up on the ultrasound screen as a bright, echogenic area.
This step is repeated with the probe sliding away to lose the visualization of the needle and subsequently inserting the needle deeper to make it reappear. This step-wise approach lets the user “walk” the needle tip down to the center of the vessel. A common pitfall is losing track of the needle tip.
Once there is confirmation of the needle tip within the vessel, decrease your angle of approach and advance more of the needle into the vessel. This secures more of the catheter within the vessel before attempting to pass the catheter. Extreme care must be taken to ensure that the needle doesn’t come out of the vessel while passing the catheter over. Small movements can result in surprisingly large movements of the needle tip.
How to confirm placement:
Unlike landmark-based IV attempts, confirmation is not on flash alone. Confirmation is based upon visualization of the needle tip within the vessel. This confirmation is often described as the target sign (Image 3). It is important to realize that the shaft of the needle can give a similar appearance as the needle tip. This is why it is important to slide the probe away from the needle, showing that the echogenicity disappears within the center of the vessel and reappears as the probe fans back to the vessel, thereby proving that the echogenicity seen represents needle tip and not shaft.
Dr. Zahn developed a teaching video for his own department that shows actual video cannulation of a vessel and many tips and tricks. You might find this useful as an adjunct to this case. Ultrasound guided IV placement. 3/2021
Pearls and Pitfalls:
Pearls:
- Get in a position of comfort, sit down with the ultrasound screen in your field of vision.
- Utilize a longer length catheter not only to reach deeper vessels, but also to secure enough catheter within the vessel.
- After accessing the vessel, decrease the angle and “walk” the needle farther into the vessel before attempting cannulation.
- Learn ultrasound-guided peripheral IV placement on patients with larger veins; it is difficult to start learning this skill on the patient with small or deep peripheral veins. Once you feel more comfortable with your skills, expand to more difficult cannulations.
Pitfalls:
- Treating this as a landmark based IV and utilizing “flash” alone as a cue for when to attempt catheter passage.
- Not utilizing single use probe covers and single use gel for your ultrasound guided IV line placements.
- Not following the needle tip and mistaking the needle shaft for the tip; this can lead to puncture of the posterior wall and unsuccessful placement of the intravenous line.
References/Resources:
AIUM Practice Parameter for the Use of Ultrasound to Guide Vascular Access Procedures. J Ultrasound Med 2019; 38:E4-E18. https://aium.org/resources/guidelines/usgva.pdf.
American Institute of Ultrasound Medicine (AIUM). Official Statement. Guidelines for cleaning and preparing external- and internal-use ultrasound transducers and equipment between patients as well as safe handling and use of ultrasound coupling gel. https://www.aium.org/officialStatements/57. Accessed 6/1/2021.
American College of Emergency Physicians. Policy Statement: Guideline for Ultrasound Transducer Cleaning and Disinfection. Approved 2018. https://www.acep.org/globalassets/new-pdfs/policy-statements/guideline-for-ultrasound-transducer-cleaning-and-disinfection.pdf. Accessed 6/1/2021.
Zahn G. Ultrasound Case of the Month: 3/2021. Ultrasound guided IV placement. 3/2021.
Constantino TG, Parikh AK, Satz WA, et al. Ultrasonography-Guided Peripheral Intravenous Access Versus Traditional Approaches in Patients With Difficult Intravenous Access. Ann Emerg Med. 2005 Nov;46(5):456-61. https://doi.org/10.1016/j.annemergmed.2004.12.026
Fields JM, Dean AJ, Todman RW, et al. The effect of vessel depth, diameter, and location on ultrasound-guided peripheral intravenous catheter longevity. Am J Emerg Med. 2012 Sep;30(7):1134-40. https://doi.org/10.1016/j.ajem.2011.07.027
Mahler SA, Wang H, Lester C, et al. Short- vs. long-axis approach to ultrasound-guided peripheral intravenous access: a prospective randomized study. Am J Emerg Med. 2011 Nov;29(9):1194-7. https://doi.org/10.1016/j.ajem.2010.07.015